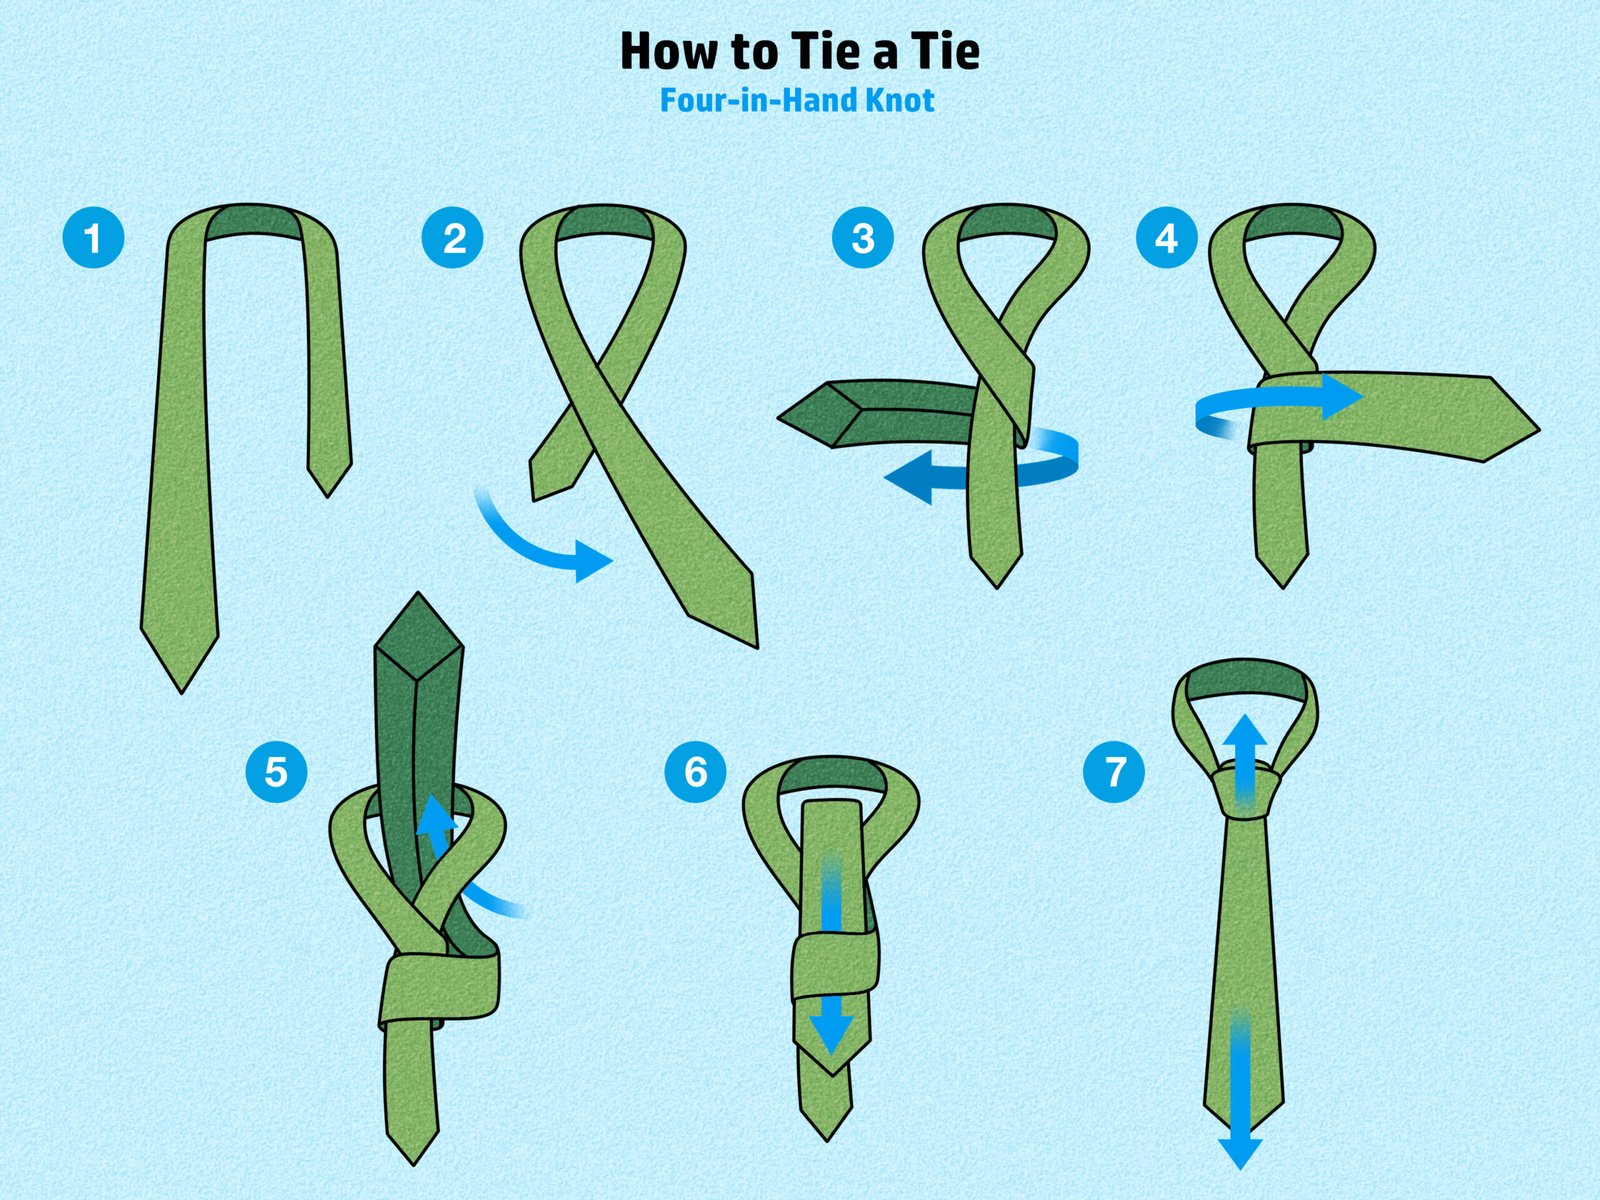
Learning how to tie a tie is a useful skill for interviews, weddings, school events, presentations, and formal occasions. It may feel awkward the first few times, but a little practice makes the process much easier. The four-in-hand knot is a good starting point because it is relatively simple, works with many shirt collars, and creates a slightly narrow, versatile shape.
Choose the right tie and shirt
Start with a tie in good condition and a shirt with a collar. A standard-length tie suits many adults, but height and body proportions can affect the ideal length. Stand in front of a mirror with enough room to move both hands. Raise the shirt collar and button the top button if you want a more formal finish. Make sure the tie’s wider end and narrow end are easy to distinguish.
Read More – What Time Is It? How to Check the Current Time Anywhere
Step 1: Position the tie
Drape the tie around your neck with the seam facing inward. Place the wide end on your dominant-hand side and let it hang lower than the narrow end. The exact starting length depends on the tie and your height, so begin with the wide end several inches below the narrow end. You can adjust the starting position after your first attempt.
Step 2: Cross the wide end over
Bring the wide end across the front of the narrow end. Wrap it behind the narrow end and bring it back around to the front. Keep the narrow end relatively still so the knot forms neatly. Avoid pulling too tightly at this stage; a little slack makes it easier to complete the next steps.
Read here – How to Appy Adhaar Card Online; Detail Steps
Step 3: Form the front loop
Bring the wide end upward behind the loop around your neck, then guide it down through the front loop you created. Keep one finger lightly on the front of the knot to maintain space. Pull the wide end through slowly so the fabric lies flat rather than twisting. Smooth any folds with your fingertips.
Step 4: Tighten and adjust
Hold the narrow end and slide the knot upward toward the collar while gently pulling the wide end down. Stop when the knot feels secure but not uncomfortable. The tip of the tie should generally reach around the top of your belt buckle. If it ends far above or below that point, loosen the knot and adjust the starting position before trying again.
Make the knot look polished
Center the knot beneath the collar and lower the collar points neatly. A small dimple just below the knot can add a classic finish: pinch the tie’s fabric at the center as you tighten it. The knot does not need to be perfectly symmetrical; a slightly tapered four-in-hand shape is normal. Check that the tie lies flat and does not twist along the front.
Common mistakes to avoid
Starting with the wide end too short is a common problem. Other mistakes include twisting the fabric, making the knot too loose, pulling so hard that the collar feels tight, or leaving the tie far above the belt. Practice slowly rather than rushing. If the tie has a thick lining or a slippery fabric, you may need to make slightly different adjustments.
Read – How Bengaluru’s Underworld Connected with Mumbai’s Gang Wars
The four-in-hand knot is an approachable way to learn how to tie a tie. With a few repetitions, the sequence becomes familiar: cross, wrap, bring up, pass through, and tighten. A well-positioned tie should feel comfortable, sit neatly under the collar, and finish around the belt line.
 Support Us